WHAT YOU SHOULD KNOW ABOUT BEADLOCK WHEELS
8 steps on how to mount them properly

— Beadlock wheels not only look trick, they serve a purpose. To get maximum traction out of your tires, beadlocks allow you to run lower air pressures without the risk of a tire rolling off its wheel. High-horsepower drag quads may also need the beadlocking protection to keep tires from spinning on the wheels after the clutch is dumped. We have seen it happen. In the event you do get a flat tire from a puncture, a beadlock will hold your tire onto the wheel, ultimately letting you finish a trail ride safely or even win that race. Following is a simple step-by-step guide on how to install a tire onto a beadlock-equipped wheel. No tire machine required! The staff of OMF Performance was consulted for this article. To see their complete line of beadlock and complete wheels, visit them online at www.omfperformance.com or you can call directly to (951) 354-8272.
STEP 1:

The first thing you will do after you unpack your new beadlock-equipped wheel is remove the ring from the wheel. With the ring removed, clean the new welded-on bead mounting shoulder and make sure all of the bolt holes are clear of debris.
STEP 2:

Push your tire over the new wheel with the beadlock side facing up. You may want to use some silicon spray or soapy water around the inner bead to help it slip over the new wheel. You should be able to do this without using tire spoons. Do not use grease, as it can make the inner bead slip off too easily when in use.
STEP 3:

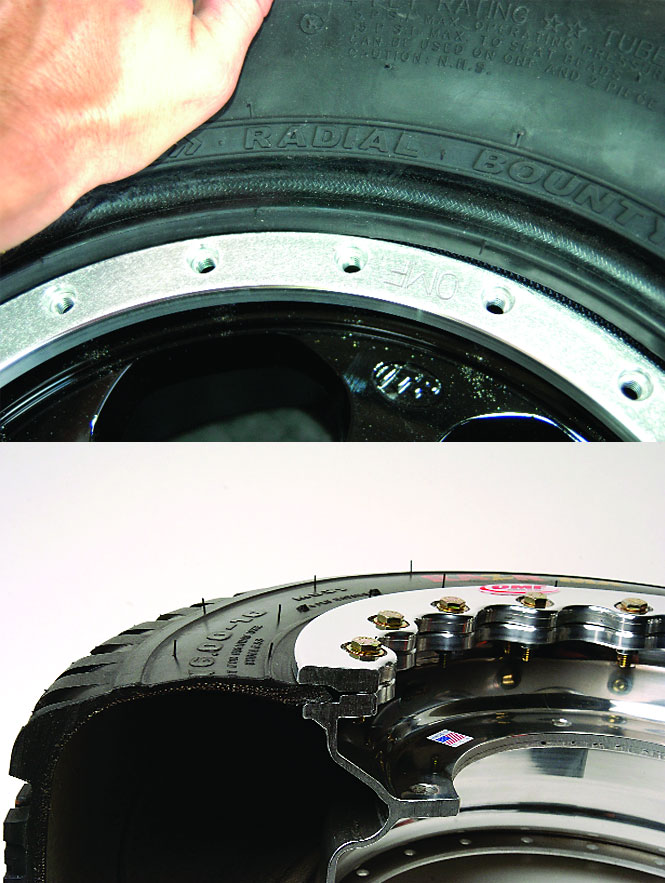
With the tire over the wheel, position the edge of the tire bead next to the welded-on mounting surface. The tire will not sit flush in the corner of the two lips. Refer to the cutaway photo of what a properly installed tire looks like sandwiched in a beadlock.
STEP 4:

Before installing the hardware, lubricate the beadlock bolts with anti-seize or equivalent lubricant to prevent galling of the threads. Then by hand, start all of the bolts. Finger-tighten them all the way around the beadlock. Make sure the tire is staying centered around the wheel.
STEP 5:

Now in a crisscross pattern, using a small wrench or T-handle, lightly tighten each bolt. Again, make sure the tire stays centered around the wheel. Every bolt will tighten with the same amount of force. If one doesn’t, it is cross-threaded or the tire bead has moved inward of the mounting surface. Impact wrenches are not recommended for installing or tightening bolts, due to the possibility of over- or undertightening.
STEP 6:

When all of the bolts are hand tight, inspect the bead of the tire and see that it is equal all the way around the beadlock ring. On this Kenda tire there are two parallel lines circling the tires bead that we used for a reference.
STEP 7:

Using a torque wrench, again in a criss cross pattern, tighten all of the bolts to (10-12 foot pounds on a 8, 9, 10, or 12-inch wheel, and 20-22 foot pounds on a 14-inch wheel.) We generally work them down in steps. On a 8-12-inch wheel we go to 4-6 foot pounds first, then 10-12 foot pounds to finish. On the 14-inch we do 6-8, the 12-14, and lastly 20-22 foot-pounds.
STEP 8:

To get the inside tire-bead to seat on the rim, apply a liberal amount of silicon spray or soapy water around the bead. With a decent air compressor, you should be able to air up the tire and pop the tire bead on to the rim. Never exceed the maximum seating pressure molded into the side of the tire. Also for safety, we cover the tire and wheel with a large, heavy blanket when seating the bead, in case of a tire, wheel or valve stem failure.


Comments are closed.